Originally written in English
This menu contains the settings for the flight recorder, for live tracking and for IGC file upload.
IDENTIFICATION
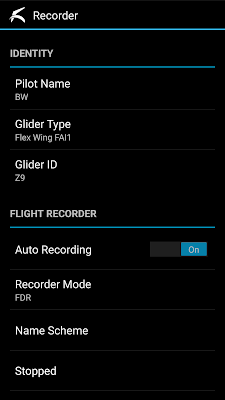
[Pilot Name]
The name stored in log files / meta data.
[Glider Type]
Defines the FAI glider type for IGC files and for live tracking.
[Glider ID]
Defines the glider ID for IGC files and for live tracking.
FLIGHT RECORDER
TotalVario has a built-in flight data recorder. The recorder can produce detailed flight data files in the proprietary FDR format, which you can also replay.
You can also generate IGC files. IGC files are signed with a "G-record" and are valid for online contest. You can use the IGC Upload feature to upload IGC files conveniently to a server.
FDR files can be converted to IGC and GPX files.
[Auto Recording]
If enabled, flights will be automatically recorded.
[Recorder Mode]
Select the mode you want to use:
- FDR is the TotalVario flight data recorder.
- IGC produces *.igc files signed with a G record, valid for online contest.
FDR files are logged with 5 samples per second and can be replayed.
IGC or GPX files can be generated from FDR files as follows:
- Open the SETTINGS menu and select [Flight Data] - Manage...
- Open the relevant subfolder and click on an FDR file for further options
- Select the option 'Convert to ...'
- Generated files are always created in the IGC / GPX subfolder for the year when the flight was made
- Existing files will not be overwritten
[Name Scheme]
Controls how the names of the recorded files are constructed. Use #UTC (UTC time) or #LOC (localtime) as placeholders to specify the position of the date/time within the name.
[Status]
Indicates the status of the recorder.
[Replay]
Opens the FDR selection dialog. Select any FDR file you want to be replayed. FDR files are organized in folders for each year.
After selecting a file, a dialog shows the available meta information of the flight. If you confirm to start replay, TotalVario switches to the main page and starts replaying the flight.
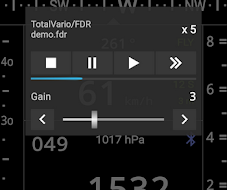
While replaying, you can click inside the top (GPS) data section to open the replay control dialog.
The dialog provides buttons for replay speed and a volume gain control slider (to reduce the playback volume).
Each click on the Fast Forward button changes the speed (2x, 5x, 10x, 20x, 50x, 100x). A click on the Play button returns to normal speed. If the limits of your hardware are reached, especially at 100x, the speed can be less than selected.
You can click on the screen outside the replay dialog to hide it, without stopping the replay.
TIP: Note that also in replay mode you can modify/adjust many TotalVario settings and thus try some 'what-if' scenarios.
[Stop]
Aborts recording or replay manually.
LIVE TRACKING
TotalVario supports live tracking using the 'Leonardo' Version 1 protocol, which works with Livetrack24 and SkyLines. Furthermore the FFVL and Puretrack APIs are supported.
Other APIs / servers can possibly be added on request.
To use the live tracking feature, first you need to select the server / URL and enter the user/account ID and the password.
After that, if a network is available, TotalVario checks the account validity. The check does not transmit position information. Furthermore the account validity is checked also when this menu page is refreshed and after a network becomes available.
If the network is slow or unavailable, information is queued internally. This works even if multiple successive live tracking sessions occur. As long as you do not force-terminate the app, normally no position data is lost.
If tracking is active, TotalVario shows a notification in the system status bar. You can click on the notification to see the transmission status, or to abort the transmission.
[Auto Tracking]
Enables/disables automatic tracking of flights.
[Status]
Indicates the current status of the network/server/session. If you click this field, a connection/account validity check is triggered.
[Start]
Starts a live tracking session manually.
[Stop]
Stops live tracking manually.
[Interval]
Select the tracking interval you prefer. If the interval is too short and the server has high load, or if there are transmission problems, the tracked positions are stored internally and sent later if possible. It is recommended to use an interval of 5 sec or more.
If the live tracking server is not reachable, you can terminate
TotalVario without losing the buffered tracking data. However if you forcefully finish the service, for example by switching the smartphone off, data will be lost.
[Server]
Select the server you want to use, or disable the live tracking feature.
Credentials
Skylines: Enter the unique tracking key assigned to your Skylines account.
Livetrack24: Enter the user name and password of the account.
FFVL: Enter your personal key that you received from FFVL. As the key is long, it is best and easiest to copy it from a web document or an e-mail.
Puretrack: You do not need to enter any login data. Instead a unique device ID is used when sending position data to Puretrack. Optionally you can use the device ID to link your Puretrack account to this device. Simply click on the Device ID field and then use the copy button.
You can also enter a label (basically any text) that will be displayed on the map if the device ID is not assigned in a Puretrack profile.
Warning: Passwords are stored using weak encryption. For security, never use a password or key for any other purpose/account.
[Insecure HTTPS]
Deactivates the verification of the identity for the selected live tracking HTTPS server. This can be useful if the server certificate has expired, or if your Android device is very old and a Root CA certifacte is missing.
Warning: Only use this option in trusted networks! User ID, Password and Data will be sent even if the network routes it to a different (third party) destination! The connection is no longer secure, similar to simple HTTP.
IGC FILE UPLOAD
TotalVario supports direct upload to the German DHV-XC server and to many Leonardo servers in different countries.
To use the upload feature, first you need to select the server and configure the user and the upload password. After that, if a network is available, TotalVario checks the user-account validity. If the login succeeded, the status 'Ready' is displayed.
You
can select one or multiple IGC files for upload. You can also terminate
TotalVario and the upload will continue in background if (or as soon as)
a connection to the server is possible.
Each upload request is logged with the corresponding date/time and result.
[Status]
If you click on the status field, a login request is sent to the server to verify if the connection is up and login is possible, and the status should be 'Ready'. Status information related to the current upload is shown here, too.
[Select For Upload]
Use this button to select IGC files you want to upload to the selected server.
Navigate to the relevant IGC folder (typically the one of the current year).
Click on any IGC file to be uploaded. In the confirmation dialog you can select if the file should be published immediately.
To select multiple files you can long click on one
of them to enter the selection mode. Then add/remove files as needed.
To upload the selected files, use the Upload button which is shown when the selection mode is active. This opens a confirmation dialog.
If
file uploads are active or waiting, TotalVario shows a notification in the system
status bar. You can click on the notification to see the transmission
status, or to abort the transmission.
There is also a button to open the upload history.
[Show Log]
This opens the upload history, where all uploads (failed and successful) are logged. Each year a new upload log file is created. The log files are located in the app folder TotalVario/log.
[Server]
Select the server that you want to use or disable the upload feature.
[User]
Enter the user name of the DHV-XC or Leonardo account.
[Password]
Enter the upload account's password
Warning: The upload password is stored using weak encryption. For security, never use this password for any other purpose/account.
Note: For DHV-XC, this is NOT your login password. Enter the upload password which you can find in your DHV-XC profile.
[Insecure HTTPS]
Deactivates the verification of the identity for the selected upload HTTPS server. This can be useful if the server certificate has expired, or if your Android device is very old and a Root CA certifacte is missing.
Warning: Only use this option in trusted networks! User ID, Password and Data will be sent even if the network routes it to a different (third party) destination! The connection is no longer secure, similar to simple HTTP.
Copyright (c) 2024, Bernd Wing*. All rights reserved.


