Originally written in English
The configuration comprises everything that you would normally do only once for a specific combination of smartphone and Bluetooth device. Depending on your hardware, different features will be available.
OPERATION MODE
First you should configure if you fly a paraglider or a hangglider. One visible effect is that the related icon is displayed in the main menu and on the wind display.
If the speed range of your paraglider is small (which is usually the case), you can select [Simple Wind Calculation] if you fly without airspeed sensor. This enables the wind estimation based on constant airspeed. If you do not select this option, you need to fly clean circles to get an updated wind estimation.
OPTIONAL FEATURES
Select if you want to use the thermals guide and/or the target guide. This influences the layout of the main screen, especially in landscape mode.
BUILT-IN PRESSURE SENSOR
If your smartphone has a built-in baro sensor, you can try if it can be used to produce reasonable results.
You need an absolutely calm day for this. Activate the option [Use Internal], select Check+Tune and read the hints. Push Analyze and wait until the measurement is finished. You can accept the suggested Kalman filter value, or try again, or modify it manually at any time.
| Pressure sensor setup tool |
After this, check the vario tone by moving your smartphone up. As long as you do not enable the weak sink tone (menu VARIO - [Profile]) you will probably not hear much at downward motion. Be careful, do not drop the smartphone!
Then you can adjust the acoustic profile and sound using the settings from the menu VARIO.
[Barometric Pressure]
If you have an internal pressure sensor and [Use External] is activated, you can use this option to select from which source Total Vario obtains the pressure data.
[Variometer]
If you have an internal pressure sensor and [Use External] is activated, you can use this option to select from which source Total Vario obtains the variometer data. Some protocols/external devices provide vario data ready for use. If this is not the case, the vario data is derived from the barometric pressure using a Kalman filter.
BLUETOOTH DEVICE
You can connect devices which use the normal Bluetooth mode (such as the Bluefly Vario), as well as devices which operate in Bluetooth LE mode (such as the XCTracer). Activate the option [Use External] to enable Bluetooth or Bluetooth LE connections.
The option [Force-Enable] can be used to switch on the Bluetooth transceiver automatically whenever TotalVario is running. If Bluetooth was automatically enabled, it will also be turned off when the app is terminated.
Use the option [Bluetooth Mode] to select the connection type.
- Standard Bluetooth devices need to be 'paired' with the Smartphone before they can be used. Only paired devices are visible for TotalVario.
- For Bluetooth LE, TotalVario can directly run a scan for nearby devices.
The option [External GPS] can be used force TotalVario to use GPS data from the connected Bluetooth device, if available. If this is enabled, IGC flight logs will not be signed for contest.
Use the option [Monitor] to trace Bluetooth data from a connected device to verify ptotocol and transmission. This is helpful for debugging. The Monitor traces essential technical information about the Bluetooth connection status. Using the Run and Pause buttons, tracing of all data sent by the remote device can be switched on or off. The monitor buffer can also be cleared if needed. In case of problems, you can use the Share button to send an Email with the complete monitor content.
Initial Bluetooth Pairing
This step is only required for standard (not Bluetooth LE) Bluetooth. The pairing is needs to be done only once. Check the manufacturers hints. Basically the required steps are:
- Go to the Bluetooth settings of the smartphone
- Start a scan for new devices
- Switch the new Bluetooth device on
- Wait until it appears in the list of available devices
- Select the new device from the list and confirm to pair it with the smartphone
Connecting the Bluetooth Device
Once the device is paired (or if no pairing is required), TotalVario must be configured to use it:
- Make sure that Bluetooth is enabled on the smartphone.
- Activate the [Use External] option.
- Select the Bluetooth Mode Normal or Secure or Bluetooth LE (BLE). Verify that you have selected the right mode for the device!
- Click [Bluetooth Device] to open the device list.
- For BLE mode, a search for near devices is immediately started. A new scan can be started if needed using the top left circle-arrow button.
- For normal Bluetooth, the list shows the known paired devices.
- Switch the Bluetooth device ON.
- Select your device from the list. This brings you back to the configuration page.
Once the device is configured, TotalVario will try to connect it automatically whenever the app is running (and Bluetooth is enabled and "Use External" is enabled). For standard Bluetooth this can take a while, please be patient.
The Bluetooth Device menu options are dynamically adapted depending on the type and protocol detected.
Connecting the XCTracer
The XCTracer should be set to the XCTRC protocol. Totalvario detects the protocol automatically as soon as the XCTracer sends data (after the signal tone for the end of the adjustment phase).
If the XCTracer is detected, you can click on the [XCTracer] option and set the pre-damping according to your taste (actually it is the number of averaged values).
There is also an option to force the use of the external GPS provided by XCTracer. Note that in this case TotalVario does not generate signed IGC logfiles (they are already present in the XCTracer).
Connecting the Bluefly Vario
The Bluefly Vario detection works automatically if the Bluefly sends PRS, BFV or BFX. For the generic modes (LK8EX1 etc) - or if the Bluefly Vario version could not be detected - there is an additional step, where the user must confirm explicitly that the device is a Bluefly Vario.
If the Bluefly Vario is connected for the first time, some hardware parameters need to be initially set. To do this, use the option [Bind Bluefly V*].
Attention, if you confirm this, hardware parameters of the Bluefly Vario will be permanently changed:
The Pitot mode will be switched on only if it is supported by the BlueflyVario version, and if airspeed is enabled, and if the selected speed sensor mode is "Pitot". Otherwise the BlueflyVario's Pitot mode will be switched off. Furthermore, in any case the Pitot will be switched on each time the Pitot zeroing is performed.
Once
this initial configuration is done, you can also refresh the required
hardware settings at any time using this function (if needed to whatever reason).
Connecting other external sensors
To choose the right protocol and settings, please refer to the vendor's documentation.
If the protocol provides only raw pressure data (no variometer data), you need to configure the extra Kalman filter by clicking [Check&Tune External]. This works in the same way as described above for the internal sensor.
BLUEFLY VARIO
This section contains some extra options for the Bluefly Vario.
You can directly enable/disable its buzzer using the [Bluefly Vario Sound] switch.
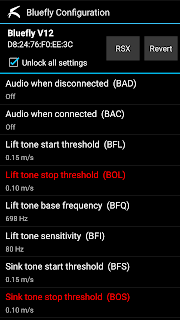
In addition you can use the [Change Hardware Parameters] option to access all hardware parameters directly. Critical parameters are initially locked.
Each time when the BlueflyVario is connected, first its hardware parameters are read and stored. Using the [Revert] button it is possible to undo all recent changes by restoring the saved values.
You can use the [RSX] button to perform a factory reset and power-off. There are some older models which continue running after reset. Be aware that after the power off you need to hold the Bluefly on/off button down extra long for the first start!
TEMPERATURE + HUMIDITY
The [Air Temperature] option allows for selecting the air temperature data source. This can be an internal or external source, depending on the available sensors.
Android smartphones can provide different temperatures: From a special sensor if available, from the battery, or from the CPU. If no other source is available, you can try battery or CPU, but this is typically a bad choice (sometimes worse than the estimated temperature).Generally you are offered to enter a
correction value when you select the temperature source. Choose
the offset so that the displayed temperature shows the current outside
air temperature at your location/altitude. An
offset error of a few degrees is generally not really critical except
for cloud base calculation.
If no temperature sensor is available, an estimation can be used (based on the air pressure, assuming a standard atmosphere). Of course this can
only produce good results in normal dry weather conditions, where the
temperature decreases with height.
Be aware that an instrument pod can easily heat up to 50 degrees or more internally when exposed to sunlight, for example while waiting for takeoff. The same is true for the smartphone sensors.
Air temperature (and somewhat the air humidity) has an influence on the conversion between TAS and IAS. Independent from the type of sensor, the built-in automatic speed calibration logic - if active - will basically compensate for any linear error of the raw TAS value while you are flying. The calibrated TAS is used for navigation related calculations.
The correct IAS is calculated based on the correction factor for TAS. This is where the air temperature (and humidity, if available) is used. As a rule of thumb, a temperature mismatch of as much as 10°C causes a calculation
error of only 2 %. For a typical air speed of 40-50 kph this is
only about 1 kph.
AIRSPEED SENSOR
Enable this option if you want to use an airspeed sensor. Note that, after the sensor is configured, you need also to select or to create a valid polar curve and adjust the stallspeed for your hangglider or paraglider (section AIRFOIL in the Settings menu).
Now select the Sensor Type (Bluetooth device with Pitot, or Flytec vane wheel sensor) that you will use.
Normally you will keep the option Auto Calibrate Speed checked. This enables the automatic airspeed calibration using GPS.
You will typically also enable Keep Calibration After Flight. Then, after some flight time, you will see that the Calibration Preset value has changed. If airspeed is not calibrated at all, you need to fly zigzag and circles for about 1/2 hour to get a stable calibration. The auto-calibration can compensate linear errors of about +-50%
For example, with my hangglider and instrument pod / Pitot the correction is about 15% (factor 1.15) for several reasons.
If you use a specific supported Pitot sensor, you can check the option Auto Zero Pitot, which will run an extra Pitot zeroing cycle (if the device supports it) each time the device is reconnected (and has not been zeroed shortly before). This option is only enabled if the sensor is connected.
[Bluefly Pitot Temperature Compensation]
If you use a Bluefly V12 with airspeed extension, it is very important that you run a residual temperature drift analyses for the differential pressure sensor chip, even if you fly at rather constant air temperature (about the same altitude). This is because the chip will start warming up in operation, and because the pod will warm up in sunlight.
The compensation is required only once for each chip. Here you can find detailed information about how to proceed.
The residual temperature drift is a non-linear effect which cannot be completely compensated by the speed calibration logic alone.
[Check Vane Wheel]
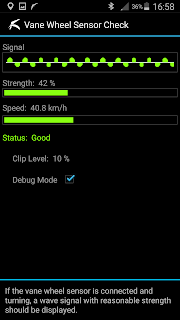
This function is useful to verify the correct operation of a Flytec vane wheel connected to the smartphone headset plug.
If the vane wheel sensor is connected and turning, a wave signal with reasonable strength should be displayed, and you should see the measured true air speed. The wave signal is clipped around its zero points to calculate its frequency.
Changing the clip level can sometimes solve problems, as smartphones have different input sensitivities (in most cases with automatic gain control).
Note: If you use this feature, be sure that no other app has locked the microphone input. Check that any voice control features, such as SVoice, Google Assistant, etc. are disabled / stopped.
PARALLEL APPLICATION
TotalVario offers a convenient way to toggle the display when running another application in parallel, such as XCSoar. To make use of it, enable this option and choose the app from the [Companion App] menu section.
You can always access the alternate app via the flight menu, but there are some other interesting options, too:
- If the smartphone has a reliably working cover sensor, you can try the [Cover Sensor] option (see SETTINGS - [Operation]). With this, you can change to the alternate app just by holding your hand for about a half second over the sensor. Especially HG pilots may want to use this option for easy screen switching in flight.
- You can also access the secondary app via the screen saver. For this, tick the option [Button on Screen Saver].
- In addition, for easier handling in flight, you can use the quick menu for easy launch of the screen saver directly from the main screen.
Some full-screen navigation apps make it difficult to minimize the app once it is displayed. In this case you can use the automatic timer function to return to TotalVario after some time (without any interaction).
If you activate the option [Launch-on-Top], the secondary app will be started automatically on top of TotalVario each time you launch TotalVario.
INTERFACE
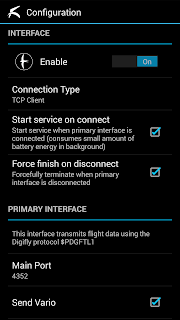
Use this feature if you want to forward sensor data to a secondary app running in parallel. Usually this will be the app configured before as alternate application, but basically these two features are independent.
TotalVario can run as TCP or UDP client. Check which connection type is supported by the secondary app (this should be TCP or UDP server). The secondary app must be configured accordingly for the Digifly $PDGFTL1 protocol and with the same port(s).
With the remaining checkboxes you can select which data to transmit. For example, XCSoar can access internal GPS and pressure sensor of the smartphone, but has a rather slow variometer and a poor wind estimation method. Therefore it is a good choice to transmit Vario, Airspeed, and Wind data. This can be selected in the Primary Interface section.
A Secondary Interface to forward GPS data is also available. It uses the NMEA protocols GPGGA and GPRMC. However navigation apps can access the GPS system of the smartphone directly, which is the better choice.
Copyright (c) 2023, Bernd Wing*. All rights reserved.


